Google OAuth Setup
For full details on setting up OAUTH 2.0 for an application to work with Google, see the Official Google Developer Documentation.
For your convenience, we provide a summary of the steps here:
- Create an account with Google Developer Console: If you don't already have one. If you are an individual working alone with the Overture suite, you may use a personal account. However, if you work for a larger organization or institution, consult your IT department for a designated account.
- Log into Google Developer Console: Sign in to your Google Developer Console account.
- Select or Create a Project: Go to Dashboard and select the existing project where you want your application to exist or create a new one.
- Register your Application: Go to the OAuth consent screen to register your application with your project. Only one app can be registered per project.
- Select User Type: Choose the appropriate User Type:
- Internal: Limits the app to users within your Google Workspace if you are part of one. |
- External: Makes the app available to any test user with a Google account. The app starts in testing mode.
NOTE: The External configuration is typically recommended, especially if you intend for external users to access and use your app.
- Click Create: Click on Create to proceed.
- Fill in App Information: Provide the following details under App Information:
- App name: Name for the app requiring consent.
- User support e-mail: For users to contact you with questions about their consent.
- Add Authorized Domains and Developer Contact Information: If you plan to deploy your app to a specific domain, add the domain under Authorized Domains. Then under Developer Contact Information, enter an e-mail address for Google to notify you of any changes to your project:
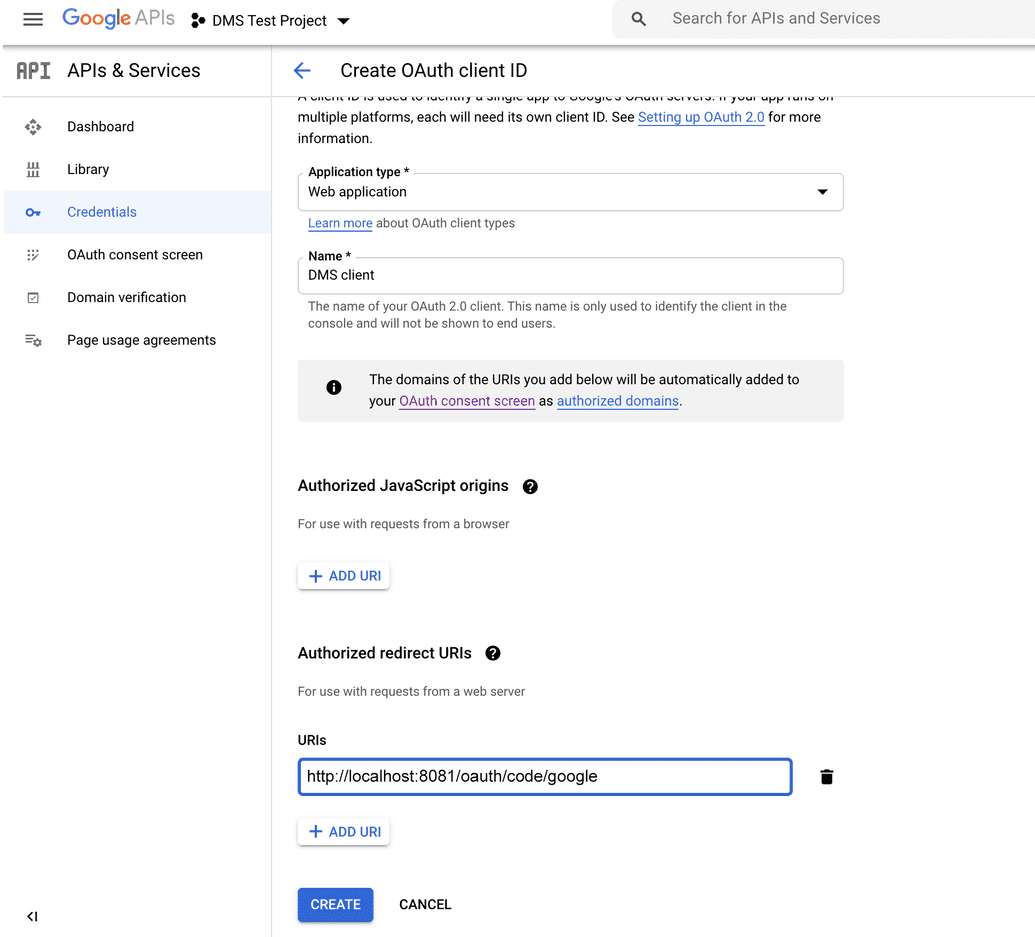
- Set up Credentials: Go to Credentials to set up your client ID and secret. Click Create Credentials and select OAuth client ID:
- Enter Information: Provide the following information:
- Application type: Set to
Web application - Name: Enter a name for the client
- Add Authorized Redirect URIs: Under Authorized Redirect URIs, add a URI. This is the URI where Google will redirect users once they have authenticated with the provider. The URI should be in the following format:
<url>/oauth/code/google
Replace <url> with the base URL where you have deployed Ego. For example:
http://localhost:8081/oauth/code/googlehttps://ego.overture.bio/oauth/code/google
- Click Create: Click on Create to proceed:
- Copy Client ID and Client Secret: The credentials for your app will be created, and the Client ID and Client Secret will be displayed. Make sure to copy and securely store these values. You can always access and view these values in the Google Developer Console by viewing your OAuth Client ID details.
Note: For full details on setting up OAUTH 2.0 for an application to work with Google, see here.
- Use Client ID and Client Secret: During Ego installation, provide the Client ID and Client Secret when prompted.


