Integrating Ego
Before integrating Ego with Stage make sure you have Ego running and configured with an identity provider. For instructions on setting up and configuring Ego see our Ego documentation here.
To add Ego to the DMS UI:
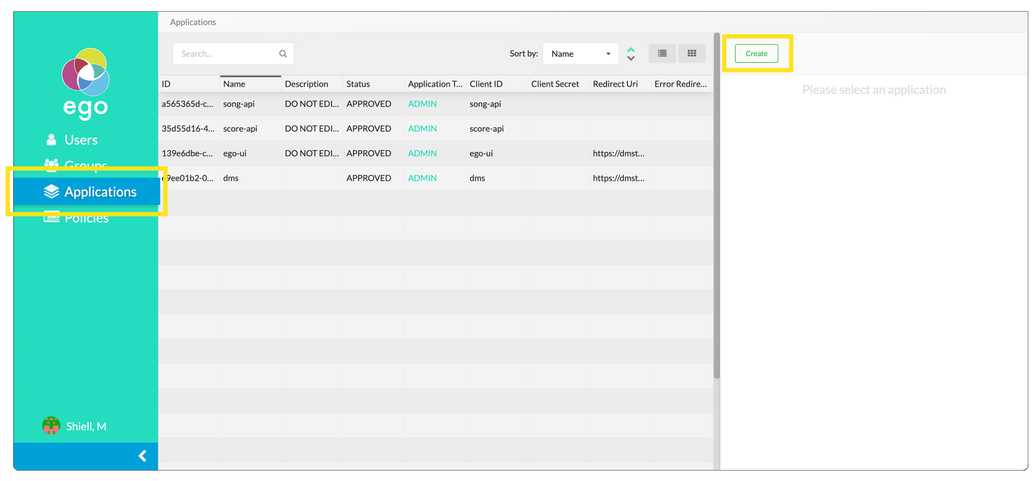
- Add Stage to Ego: From the Ego Admin UI's left-hand panel select Applications. From the Applications screen on the right-hand side click Create.
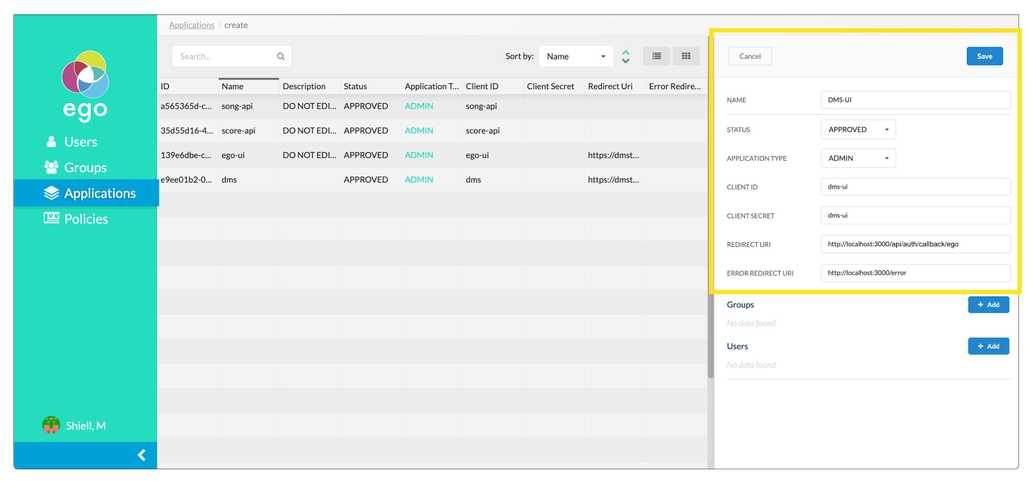
Insert the following information:
| Field | Value |
|---|---|
| Name | Stage |
| Status | Approved |
| Client | Stage |
| Client Secret | Stage |
| Redirect URI | http://localhost:3000/api/auth/callback/ego |
| Error Redirect URI | http://localhost:3000/error |
You can leave the Groups and Users fields blank. Click the save button on the top right of the panel.
Create an environment variable file: Within the cloned Stage repository locate your
.env.dmsuifile, if you have not created one yet duplicate theenv.schemafile and rename it to.env.dmsui.Update environment variables:Variables within this file are already preconfigured for a local setup:
######### Ego# Auth providerNEXT_PUBLIC_AUTH_PROVIDER=egoACCESSTOKEN_ENCRYPTION_SECRET=super_secretSESSION_ENCRYPTION_SECRET=this_is_a_super_secret_secret# Base url for Ego APINEXT_PUBLIC_EGO_API_ROOT=http://localhost:8081# Ego registered app idNEXT_PUBLIC_EGO_CLIENT_ID=Stage
However, you will need to update the NEXT_PUBLIC_SSO_PROVIDERS variable in line with the SSO provider(s) you want available:
NEXT_PUBLIC_SSO_PROVIDERS=GOOGLE,GITHUB,ORCID,LINK######### Optional features/functionalitiesNEXT_PUBLIC_DEBUG=true
Note: you will need to set up a client ID and client Secret through each provider. For more information see our documentation on setting up identity provider secrets
- Restart Stage: From the command line exit out (Ctrl/Cmd + C), and re-run Stage
npm run dev.
Once compiled you should be able to access Ego by clicking login on the upper right corner of Stage.

